Hey! Yes you! Is your backpack too heavy? Then try a Rollie Pack!

Do you have a super heavy backpack and do you ever get tired of lugging it around? For a school project, we had to create an invention that help or entertain others. Our invention was backpack to help with posture and to solve that problem of super heavy backpacks. call it The Rollie Pack. The Rollie Pack is a backpack with wheels that extend down to the ground to help support the weight from your backpack.


The design process is a series of steps taken to create a product or invention.  The design process we used was to Empathize, Define the Problem, Ideate, Patent, Prototype and Test, Product and Packaging Design, Market and Share our product.


First, we found the problem. We found that backpacks are getting too heavy and we wanted to solve that problem. To ideate a solution, we thought about what could we do or add to a normal backpack to make the backpack lighter and easier to use. We decided we could have a backpack with wheels that extend down from the backpack from a standing position adding support and to aide the user in carrying the backpack.  When we patented our idea, to do this we searched for patents similar to ours. Since there were not any patents similar to ours, we sent a patent application to the teacher which she approved.  Next, we designed our backpack and logo by drawing them on paper. After we designed our idea, we tested our product by asking our classmates if our prototype would be useful to them and what they would add to it. We decided to remove the weight sensor that was original in our design after hearing people didn’t want one. After we tested, we made our product and packaging.    We made our product miniature  version of the backpack by using a pencil case. We then designed our packaging. 
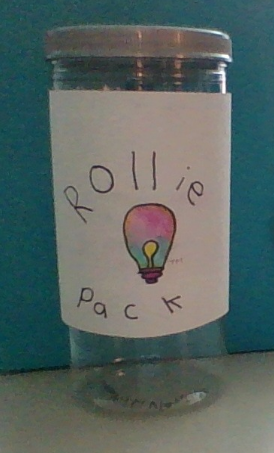
We used an old pretzels container and decorated it with our logo and information about the Rollie Pack. Finally, we made a marketing video/ infomercial to try and sell our product.


In conclusion, we used the design process Empathize, Define the Problem, Ideate, Patent, Prototype and Test, Product and Packaging Design, Market and Share our product to create our invention and advertise our product. After doing so, we had our product, The Rollie Pack.

Coastal Barrier Project

In 2011, a massive tsunami with over 10 meter waves crashed down on Japan and destroyed almost all the cities along the shoreline. All the cities that were destroyed had seawalls that were less than ten meters high, except for the city of Fudai who had built their seawall 15.5 meters tall after their mayor, Kotoko Wamura, had barely survived a tsunami in 1993 and vowed to protect their city from other dangerous tsunamis. When the tsunami struck Japan in March of 2011, Fudai was the only city left standing after the tsunami had destroyed and taken all the other cities along with it. Our design challenge was to design a prototype of a coastal barrier device that will protect the shoreline from a tsunami.


The criteria for our coastal barrier include, the device should stop the water from going over the wall and it must be able to deflect any water away from the shoreline. It must also be sturdy and durable enough to withstand the waves. The device must be made out of materials offered in class and must use 3D-printed parts. Lastly, the wall must be able to withstand up to two gallons of water, the maximum that will be used in the testing area. A constraint of the design is that it has to built with 3D- printed components and materials offered in the classroom. The 2011 Japanese tsunami was caused by the Pacific and the Okhotsk plates. The Pacific and Okhotsk plates started to push against each other until eventually the Okhotsk plate snagged under the Pacific Plate. The Okhotsk plate started to bend until it eventually snapped, forcing the water to move upward causing a tsunami. To start the process of designing our wall we made a sketch of what we wanted our wall to look like from the top, side, and front views. We also included measurements in our sketch. After our sketch was approved, we started building our walls on Tinkercad. First, I put a box on my tinkercad platform and contorted it to the size I wanted my wall to be. Then, I made the curve of my seawall by using a cylinder cut-out and added an extra curve by putting an upside down ramp at the top.


There were many parts in this project that were easy, but there were some that were also challenging. For example, I found it difficult to come up with creative ideas that would differ from everybody else, but I found it surprisingly easy to learn how to use tinkercad. While it was easy to learn, tinkercad also had some difficulties. For example, it was difficult for me to maneuver the objects so that they faced the right way, lined up with each other, or were the size I wanted them to be. Despite the difficulties, once I had the base of my wall sized and built correctly, it was very easy to add extra features, like the ramp on the top that my wall more of a curve. If I could do this project again, I would change many things. I would change the height of my wall and make it taller so that it is a few centimeters shorter that the box. I would also try to find a way to make my wall more of a curve so that the wave flows back to the water.